Back to School Brushstroke: What It Is and How to Use It Without the Common Pitfalls
If you have spent any time browsing design marketplaces or print-on-demand forums lately, you have likely come across the term Back to School Brushstroke. It appears in PNG sets, digital scrapbook kits, and SVG bundles aimed at teachers, homeschool parents, small shop owners, and content creators preparing for the autumn season. But what exactly is it, and why does it seem to be everywhere each August?
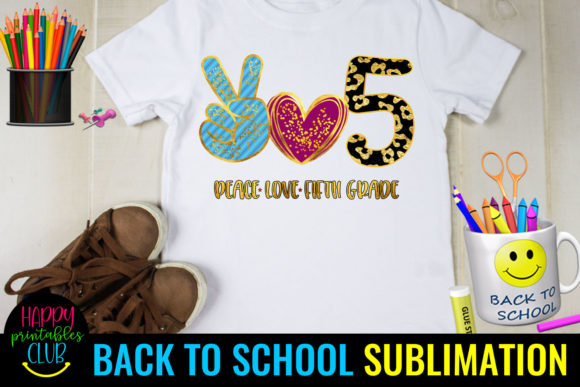
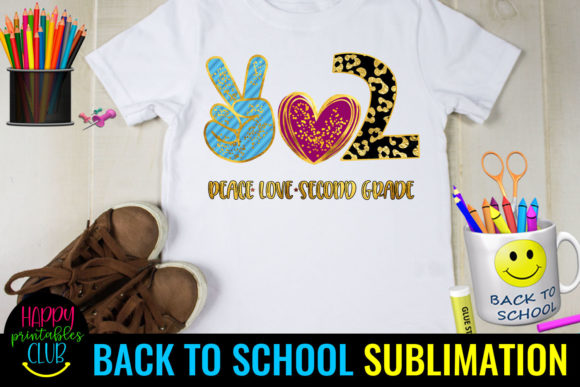
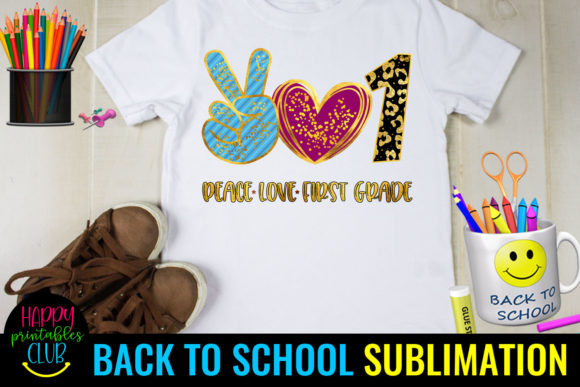
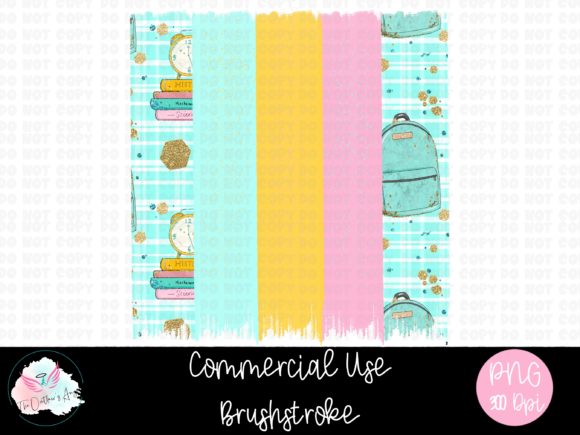
At its core, a Back to School Brushstroke is a decorative digital element that mimics the look of a painted or inked stroke, often combined with school-themed imagery such as apples, pencils, chalkboards, or bus silhouettes. When offered in PNG format at 300 dpi, it is meant to give you a ready-to-use, high-resolution graphic that drops cleanly into your own projects. The appeal is obvious: you get a handcrafted, artistic look without needing to mix real paint or scan anything yourself.
Yet, as with any popular design resource, there are common mistakes and misunderstandings that can turn a useful tool into a frustrating one. Whether you are a beginner assembling your first back-to-school banner or an experienced seller building a seasonal collection, knowing what to watch for will save you time, money, and creative energy.
The Appeal of the Back to School Brushstroke Concept
Before diving into the pitfalls, it helps to understand why this particular style resonates. A brushstroke, by its nature, suggests movement, warmth, and a handmade quality. When that stroke is paired with school symbols, it softens what can otherwise feel like a rigid or institutional theme. A pencil rendered in a crisp vector might feel cold; the same pencil rendered as a textured brushstroke feels approachable and nostalgic. That is the sweet spot the Back to School Brushstroke aims to hit. Many people choose it because they want their materials to feel personal, not mass-produced. The PNG format makes it especially easy to drop onto a T-shirt template, a classroom poster, or a social media graphic without fiddling with layers or masks.
The 300 dpi resolution further signals that this is intended for print-ready projects, not just screen use. That detail matters if you plan to sell physical products such as stickers, notebooks, or wall art. Yet, it is also one of the first places people go wrong.
Mistake 1: Assuming All 300 dpi PNGs Are Print-Ready
It is easy to see the phrase "300 dpi" and assume the file is good to send to the printer. However, resolution is only part of the equation. A 300 dpi PNG that is only 200 pixels wide will print as a tiny, blurry mark. The actual physical size matters just as much. A proper Back to School Brushstroke PNG intended for print should have both a high pixel dimension and a resolution of 300 dpi. For example, a 3000 x 3000 pixel image at 300 dpi gives you a usable 10 x 10 inch print area. Anything smaller, and you risk disappointment.
What to check instead: Always look at the pixel dimensions before you buy or download. If a listing says "300 dpi" but the image is only 600 x 600 pixels, that file is best used for digital display, not for printing on a large tote bag or poster. If you need a bigger size, either choose a larger file or plan to use the brushstroke as an accent element rather than a hero graphic.
Mistake 2: Ignoring the Background and Transparency Details
A PNG file should, in theory, support transparency. But not all PNGs are created equal. Some Back to School Brushstroke PNGs come with a faint, off-white halo around the stroke, especially if they were poorly extracted from a scanned painting. Others might have jagged edges or leftover background pixels that become visible when you place the image on a colored background in your design software. This is particularly frustrating if you are layering the brushstroke over a dark or patterned surface.
How to avoid this: Before committing to a set, look for a close-up preview that shows the edge quality. If the seller provides a zoomed-in sample, you can see whether the edges are smooth and truly transparent. If the preview shows the brushstroke on a white background only, proceed with caution. A good seller will show the asset on at least two different backgrounds so you can verify the transparency. If you already own a file with a visible halo, you can sometimes fix it in photo editing software by using a levels adjustment or a blending mode, but it is far better to start with a clean file.
Mistake 3: Treating Every Brushstroke as a Standalone Element
One of the most common misunderstandings is that a Back to School Brushstroke PNG is a complete design by itself. In some cases, that is true. A large, detailed brushstroke that spells out "Welcome Back" or features an illustrated apple and book stack can absolutely stand alone on a card or poster. But many brushstroke sets are designed as building blocks, not finished compositions. They are meant to be combined, rotated, scaled, and layered with other elements. If you treat each PNG as a final product, you miss the real value of the resource.
A better approach: Think of brushstrokes as a flexible library. Use them as borders, underlines, dividers, or texture layers. Combine a few different colors and orientations to create a custom banner. Layer a subtle brushstroke behind your main text to add depth. The goal is to treat the set as a creative toolkit, not a collection of finished stickers. When you shift your mindset this way, a single bundle of 20 brushstrokes can yield hundreds of unique layouts.
Mistake 4: Overlooking Consistency in Style and Color
Another mistake that trips up both beginners and seasoned creators is mixing brushstrokes from different sources without checking for style consistency. One brushstroke set might have a rough, dry-brush texture with uneven edges, while another has a smooth, wet-ink look. When you combine them in the same project, the result can feel mismatched and unintentional. Similarly, color accuracy matters. A set labeled "Back to School" might lean heavily into warm golds, burnt oranges, and deep reds, which is lovely for fall. But if you drop a blue brushstroke from a different set next to it, the palette may clash unless you deliberately adjust the hues.
How to stay consistent: When you find a brushstroke set you like, try to use it as your primary resource for that entire project. If you absolutely need to add elements from another set, spend a few minutes adjusting the colors or applying a filter to unify the textures. Many design programs let you recolor PNGs using hue and saturation controls. Taking that extra step makes your final piece look cohesive rather than cobbled together.
Mistake 5: Forgetting the Practical Limits of Digital Brushes in Physical Products
Because these brushstrokes are designed to mimic paint, they often include fine details, thin tails, and tiny specks that look beautiful on screen but can cause problems in production. If you are printing on a mug, a shirt, or a notebook cover, very thin lines may not transfer properly or may wear off quickly. A brushstroke that has delicate, hairline splatters might look exquisite in a digital mockup but could become a muddled mess when screen printed or sublimated onto fabric.
What to consider before production: If you plan to sell physical items, review the brushstroke at actual print size and look for any details thinner than about 1/16 of an inch (roughly 1.5 mm). Test a sample if possible, or at least consult your printer about minimum line thickness. Many experienced print-on-demand sellers will simplify or thicken certain brushstroke elements before sending them to production. You can often do this by adding a minimal stroke outline or by scaling the image slightly larger so the thin parts become more robust. This small adjustment can prevent returns and unhappy customers.
Mistake 6: Downloading Without Checking the License
This mistake is less about art and more about business, but it can be costly. Back to School Brushstroke PNGs are often sold with specific licenses that limit how you can use them. Some allow unlimited commercial use, including for physical products you sell. Others restrict use to personal projects only, or limit the number of copies you can produce. Many small business owners have learned this lesson the hard way after receiving a cease-and-desist notice or being banned from a marketplace for using an asset without the proper license.
How to stay safe: Always read the license terms before you purchase. Look for keywords such as "commercial use," "print-on-demand," and "unlimited copies." If the license seems vague, contact the seller directly. Reputable creators will clearly state what is and is not allowed. If you are building a shop on platforms like Etsy, Redbubble, or Amazon Merch, keep a folder with copies of your licenses so you can prove your right to use each asset. This is not paranoia; it is standard practice among professionals.
Putting It All Together: A Better Way to Work with Back to School Brushstroke PNGs
The Back to School Brushstroke, when used thoughtfully, can be a wonderfully efficient and beautiful resource. Its strength lies in the illusion of handcrafted charm without the mess of real media. To get the most out of it, start by verifying the file dimensions and true resolution. Test the transparency on a colored background before you build an entire layout around a single PNG. Use the brushstrokes as modular pieces, combining them creatively rather than expecting each one to carry a whole design. Keep your style consistent across all the elements in a project, and always adapt fine details for physical production. Finally, respect the license that comes with your download.
By avoiding these common missteps, you save yourself from wasted time, disappointing print results, and legal headaches. More importantly, you free yourself to focus on what matters: creating designs that feel fresh, personal, and ready for the school year ahead. Whether you are making a welcome banner for a classroom, a set of teacher stickers for your online shop, or a back-to-school social media campaign for a local business, a well-chosen brushstroke can be the difference between a design that looks generic and one that looks genuinely thoughtful.
Start with a clean, high-quality file, layer it with intention, and always ask yourself what the final product will really look like in someone's hands. That is the approach that separates a good design from a great one. The Back to School Brushstroke is a tool, not a shortcut. Used well, it helps you communicate warmth, creativity, and care exactly when your audience is looking for it.