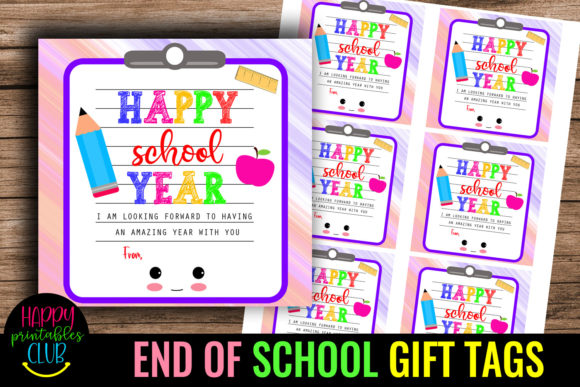
Happy School Year: Back to School First Day Gift Tags Made Simple and Effective
The excitement of a new school year is something both students and teachers feel deeply. For many, that first day back is a moment to set the tone for the months ahead. Small gestures of appreciation—like a thoughtful gift tag attached to a treat or a note—can make a real difference in how welcome a teacher feels. That is where a well-designed, easy-to-print gift tag comes in. The Happy School Year-Back to School First collection offers a simple digital solution for creating those heartfelt touches. But as with any print-at-home product, the difference between a polished result and a frustrating one often comes down to a few overlooked details.
Let’s walk through what this product is, what common mistakes people make when using digital gift tags, and how you can get the most out of your download without wasting time, ink, or paper.
What Exactly Is the Happy School Year-Back to School First Gift Tag Set?
This is a digital product designed for anyone who wants to add a cute, professional-looking tag to a back-to-school gift. The set includes a ZIP folder containing three file formats: one PDF at 8.5 x 11 inches, one JPEG at 8.5 x 11 inches, and one PNG at 8.5 x 11 inches. Each tag itself measures 3.5 x 3.5 inches, making it a perfect size for attaching to a gift bag, a coffee cup, a small treat, or even a note left on a desk.
Because it is an instant download, there is no physical item shipped to your mailbox. You purchase, download, print at home or at a local print shop, and then cut and attach. This convenience is a huge time-saver, especially during the busy back-to-school season. However, having the file is only half the process. The other half lies in how you print, cut, and use the tags.
Common Mistakes People Make with Digital Gift Tags
Even a simple product like this can trip people up. Here are the most frequent errors I see, along with practical ways to avoid them.
1. Ignoring the Color Variance Warning
The product description clearly notes that colors may appear different on your screen compared to the printed version. This is not a flaw in the design—it is a standard reality of how monitors and printers reproduce color. Many people see the vibrant colors on their screen, hit print, and then feel disappointed when the output looks a bit duller or slightly off.
Better approach: Before printing a whole sheet, print a single test tag on regular paper. Compare the printed color to what you see on your screen. If the difference is too large for your liking, you can adjust your printer settings (choose higher quality, or set your printer to photo or premium paper mode) or tweak your monitor’s calibration. This simple step saves you from wasting an entire sheet of cardstock.
2. Choosing the Wrong File Format for Your Needs
The ZIP folder includes PDF, JPEG, and PNG files, all at the same letter-size sheet. Each format has strengths, but people often grab the first one they see. The PDF is ideal for crisp, consistent printing because it embeds fonts and layout information precisely. The JPEG and PNG are raster files—great for digital use, such as sharing a tag design in an email or posting a photo of your gift online. But for physical printing, the PDF is almost always the safer choice because it avoids any unexpected scaling or quality loss.
Better approach: Use the PDF for all your printing. Reserve the PNG or JPEG for any digital sharing (like sending a preview to a friend or posting your finished gift on social media). Do not resize the PDF on your own in a photo editor unless you are comfortable with resolution settings—the 8.5 x 11 layout is already optimized for standard letter paper.
3. Skipping the File Inspection Before Cutting
One of the most common oversights is downloading the file, printing it, and then cutting the tags without checking that the print alignment is correct. If your printer tends to shift content slightly (many do), the 3.5 x 3.5 inch tags might not line up perfectly with a paper cutter. People end up with uneven borders or cropped text.
Better approach: After printing, hold the sheet up to a light and look at the cutting guides. If the borders look off, adjust the print settings to “fit to page” or “scale to fit,” and make sure margins are set to default or minimum. Some printers have a “borderless” option that can help, but test it first. A few minutes of checking can prevent a pile of wonky tags.
4. Using the Wrong Paper
Gift tags need to feel substantial. Printing on standard copy paper leads to flimsy tags that wrinkle, tear, or look cheap. This undermines the whole purpose of giving a thoughtful gift. On the other hand, using super heavy cardstock can jam some printers or cause ink smudging because the paper absorbs differently.
Better approach: Use a paper weight between 65 lb and 80 lb for a nice, sturdy feel that still feeds well through most inkjet or laser printers. Matte cardstock works best because it shows colors cleanly without glare. If you want a glossy finish, use a printer that handles glossy paper properly, and let the ink dry fully before stacking or cutting.
5. Forgetting to Plan the Attachment Method
The tags are 3.5 x 3.5 inches, which gives you plenty of space for a hole punch and ribbon or a piece of tape. But people sometimes print and cut without considering how they will attach the tag. If you punch a hole too close to the edge, the tag can tear. If you use tape, it might leave residue on the gift or the tag.
Better approach: Decide before cutting how you will attach each tag. If using a ribbon, punch a hole at least half an inch from the edge. If using tape, use double-sided tape or a glue dot for a clean, invisible hold. You can also attach the tag to a small bag with a binder clip or a clothespin for a rustic look. A little planning makes the final presentation look intentional rather than rushed.
What to Check Before You Buy or Download
Before you commit to any digital product, it helps to confirm that it fits your specific use case. Here are a few things to review regarding the Happy School Year-Back to School First set:
- File compatibility: Make sure you have software that can open PDF, JPEG, and PNG files. Almost any modern device can handle these, but if you plan to edit the tags (adding a student name or teacher name), you will need a program that supports PDF editing or image editing. The files as provided are not editable in the sense of layered templates—they are ready-to-print designs.
- Printing setup: Confirm that your printer can handle letter-size paper (8.5 x 11 inches). If you use A4 paper, you may need to adjust print settings to avoid cropping. Most home printers default to letter, but double-check.
- Intent of use: These tags are ideal for classroom teachers, staff appreciation gifts, or even for students to give to each other. If you need a tag for a different occasion, the theme is clearly back-to-school, so it fits that niche perfectly.
Practical Advice for a Polished Final Result
Once you have avoided the common pitfalls, you can focus on making your gift tags look truly professional. Here are a few extra tips:
- Cut with precision: Use a paper trimmer rather than scissors for straight edges. If you want rounded corners, a corner punch adds a nice finished look.
- Pair with simple gifts: A tag on a coffee shop gift card, a small plant, a homemade treat in a bag, or even a new pen set goes a long way. The tag adds the personal touch without needing an expensive present.
- Include a handwritten note: The back of the tag is the perfect place for a short, sincere message. Teachers truly appreciate knowing why they are appreciated.
- Print extras: Because you are working with a full sheet of three tags (or more depending on the layout), print a few extra sheets. Keep them on hand for last-minute gift needs or for other school staff members.
Why Thoughtful Presentation Matters
The first day of school can be overwhelming for everyone. A small, well-presented gift with a charming tag signals that you see the teacher as a person, not just an employee. It shows effort, care, and attention to detail. The Happy School Year-Back to School First gift tags help you communicate that feeling without spending hours designing something from scratch. The key is to treat the printing and preparation with the same care you want the tag to convey.
By understanding the nuances of color variance, file formats, paper choice, and attachment methods, you elevate a simple digital download into a meaningful gesture. Avoid the common shortcuts that lead to disappointing results, and you will find that even a small gift tag can leave a lasting impression.
Final Thoughts on Using Digital Gift Tags Well
Digital products like this one are designed to make your life easier, but they still require a little attention to detail. The biggest mistake people make is assuming that “instant download” means “instant perfect result.” In reality, the short time you spend testing, selecting the right paper, and cutting carefully pays off in a finished product that looks and feels thoughtful. Teachers receive a lot of generic items—a gift tag that is clearly intentional stands out.
Whether you are a parent, a fellow teacher, or a school administrator, taking those extra steps turns a simple tag into a message of genuine support. That is worth a few extra minutes of preparation. And with the Happy School Year-Back to School First set, you already have a design that is cute and appropriate for the occasion. Your job is to bring it to life in the best possible way.